In late 2017 we renovated the bottom floor of our Sydney terrace, changing up the lounge, dining and (most importantly) undertaking a total kitchen renovation! We worked with Blakes of Sydney to make our ideas come to life. Now, come and have a little stickybeak…
Truthfully, I wasn’t 100% into renovating when the idea first came up. We’d just moved back from London and shoved some boxes into our house. When we initially started discussing it, I was thinking, ‘oh yeah, we’ll start this in 2018, maybe.’ It felt like an overwhelming task. But thanks to my extremely motivated husband, somehow our kitchen renovation started October 2017! (And we only had moved back from London in September 2017. Speedy!)
Because we have been overseas for so long, I couldn’t find many ‘before’ photos to use, but here’s what our house looked like just before we leased it out in 2014:
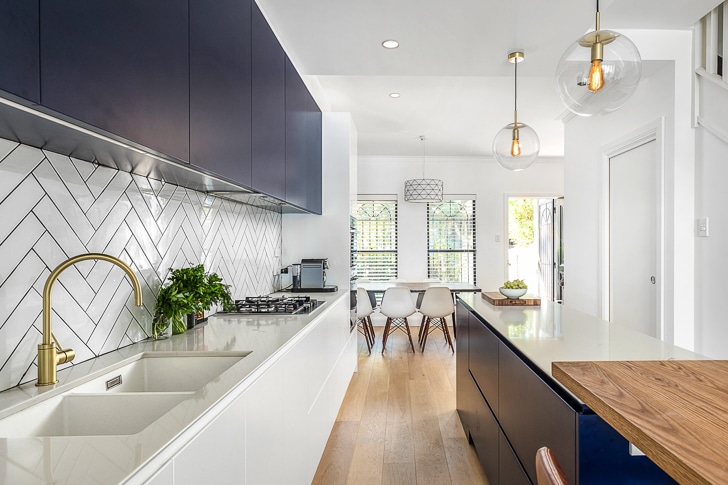
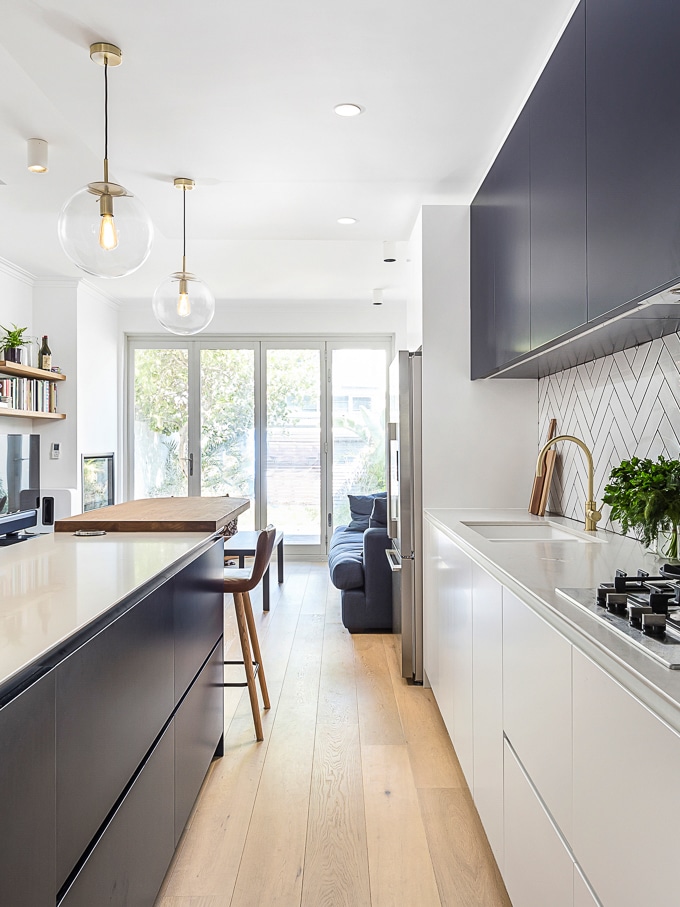
And in case you couldn’t tell, the picture at the very top of this blog post is our new kitchen!
Kitchen renovation inspiration
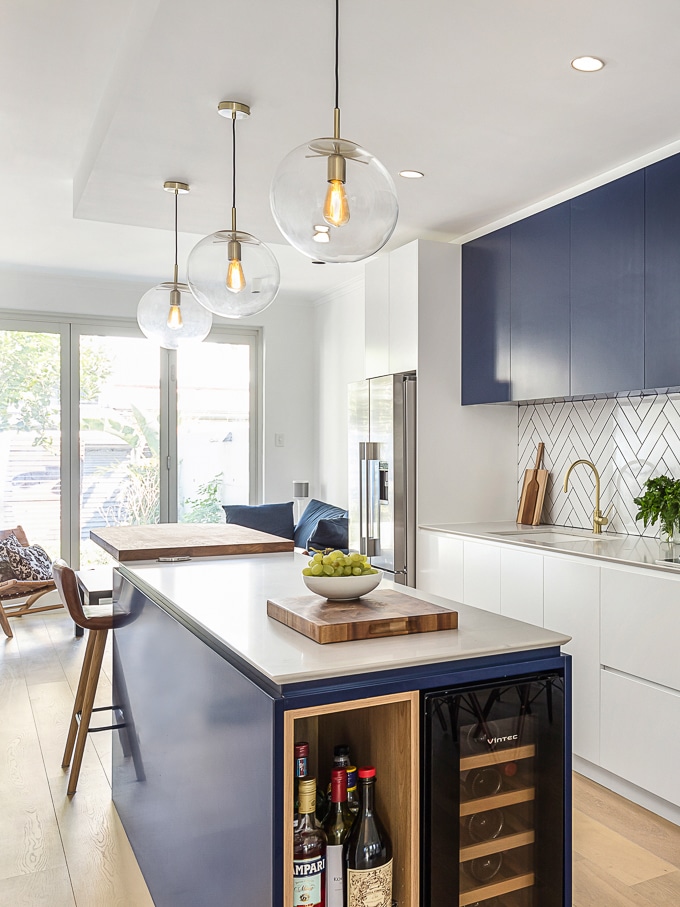
We have a terrace house, which means our space is quite narrow and long. Before renovating, we had a U-shaped kitchen in the middle of the house. This was quite bulky and kind of cut our bottom floor in half. Our main priority was taking advantage of the length of our house, and opening it up so it flowed all the way through.
Like everyone else, of course we hit up Pinterest for millions of kitchen renovation pictures, colour palettes and general house design ideas. Even if you’re not 100% sure what you’re looking for when you start, I find browsing on Pinterest helpful because you start to see trends in the images you are drawn to. Some key ideas that we really loved and wanted were:
- white subway tiles (we ended up using them in a herringbone pattern for our splash back, which I LOVE);
- a simple, minimal colour scheme that wouldn’t date too quickly (compared to the pale pinky-cream cupboards we replaced…!);
- a really functional kitchen island where we could eat meals and with lots of food prep space;
- and of course, heeeeeeeaps of storage for the million appliances and plates/bowls/things that I own #foodbloggerproblems.
Working with a renovation broker – Blakes of Sydney
My husband and I are total renovation novices. (Besides being pretty good at trawling Pinterest…I know nothing.) So, we made a really smart move right at the start of our project and enlisted professional help.
Blakes of Sydney are renovation brokers – something you might not have heard of before, it’s slightly unusual! Basically, a renovation broker consults with you and connects you to all of the trade experts you will need to complete your renovation project. With Blakes of Sydney, this connecting process is free. They make a commission from the tradespeople they refer, as any other type of broker does.
BOS also offer a design service (charged at a flat rate fee), where they will draw up your design using 3D computer software. We used this service as well; Blakes put it together really quickly and it was very cost effective.
So, if you use the design and the broker service, it looks like this:
- Meet the Blakes of Sydney team;
- Design is created;
- Blakes of Sydney connect you with your experts;
- Blakes of Sydney negotiate with your experts (very important!);
- Discuss the options with the BOS team and make decisions;
- Get cracking.
The negotiation part is incredibly useful and something that would have been a lot more difficult to do alone. It’s one thing to get a bunch of quotes from various people, but what we got was so much more than this. BOS seek out quotes for you, and then report back with a range of options, essentially ordered from basic through to luxe. We then had time to discuss the options with them and understand the points of difference between the price brackets. This was really valuable and helped me thoroughly understand the difference between specific materials and features we were considering (without feeling pressured to pick a certain brand or anything like that).
Blakes of Sydney also pride themselves on connecting you with experts that will suit you, not just financially but who you will genuinely enjoy working with. They could not have done a better job connecting us with our builder, Justin. He was lovely to work with and project managed our renovation for us to a sky-high standard.
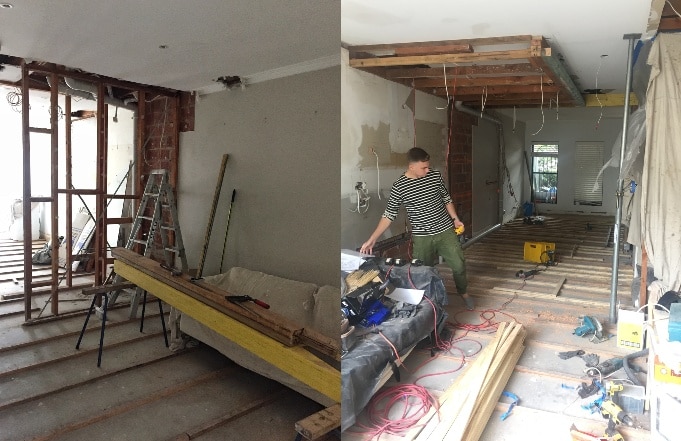
Here are some fuzzy iPhone shots taken when the renovation had just started and all the old stuff had come down. You can find more of them on my Instagram…
Implementing our kitchen renovation
Our renovation was all wrapped up by late January 2018. It would have come together more quickly than this, however we had the Christmas holiday period to deal with. Delays on ordering/receiving anything custom-sized!
As we basically ripped out the whole bottom floor of our terrace, we had to move out of our house for a few weeks while the floor was gone. But we did move back in before we had a kitchen – trust me you can do it! I bought a small electric stovetop, and between that, our fridge and a microwave we managed. Lugging things up the stairs to the bathroom to wash anything up was a bit painful, but I like to think I really toned up my legs 🙂
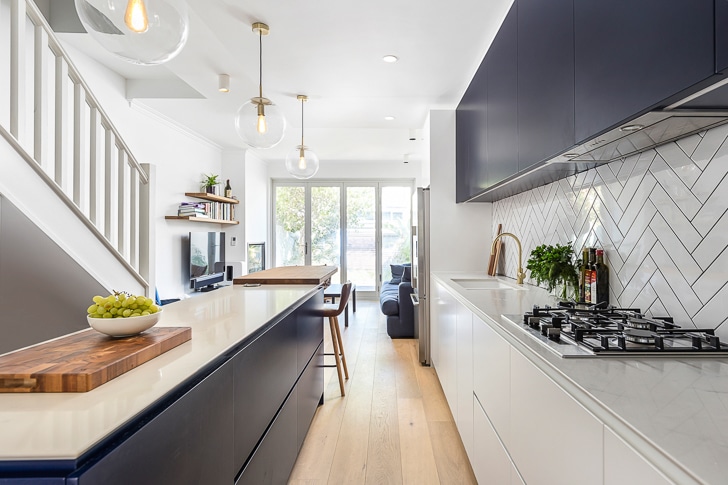
We’re really happy with how the place turned out, and I’m still stunned by how quickly it came together. The kitchen has been a dream to work in; the long island bench is AMAZING for laying out all my prep when I’m cooking. And besides the kitchen renovation, I’m also really happy with the way we flipped our layout around and put our living room at the back of the house, where it’s brighter and nicer to sit. The new fireplace isn’t bad, either…
I thought I’d finish with a quick list of some of the main suppliers/products we used in the kitchen in case you’re curious!
- White subway tiles are from Beaumont Tiles.
- Kitchen bench top is Smartstone in Carrara.
- Navy blue kitchen cabinets are poly cabinets sprayed with Dulux Ahoy, and the white joinery is sprayed with Dulux Lexicon Quarter.
- Gold tapware is from Phoenix Tapware.
- Appliances (oven, combination oven, rangehood and stove top) are Bosch.
- Walls are painted in Dulux Lexicon Quarter.
- Timber bench (at the end of island) and shelves were custom made, as was the brass support leg supporting the timber bench.
Hope you enjoyed this sneak peek inside my house! Have you renovated or are you renovating at present? Love it or hate it?
*Please note, this blog post was sponsored by Blakes of Sydney, however we selected them and starting working with them well before that happened. All opinions expressed are my own; we really couldn’t have managed this renovation so quickly without them.
*Photo credits of our renovated house: by @sydney_real_estate_photography
Hi Monique,
Thanks for writing this up – I was excited to stumble across your kitchen reno, not just because it’s beautiful, but because it looks to me similar measurements to what I’m trying to work within – and you’ve given me hope it might be possible! Can I ask what length your island and back wall is? And also wondering what you did about a pantry?
Thanks,
Renee
Hello! I love the look of your kitchen! We are also doing a herringbone pattern and a navy blue island with white cabinets as well. What grout color did you end up going for? Is it navy? Thanks!
Hi Kelly, I’m so sorry for the delay in replying to you! We ended up going with a charcoal grout. I hope your renovations are going well!
Hi,
Can I ask how wide your kitchen area is? We’re about to start our renovation and want to move the kitchen in to the centre of the house. I think ours might be too narrow for an island (310cm) But yours looks great and a similar width…
Thanks!
Hi Alexandra, thank you for your message. I’m sorry that I have taken so long to reply, due to a personal health issue I was hospitalised over the Christmas period for a month and I am only just catching up now. I have just spoken with my husband to double check the measurements and he says you will definitely be fine with 310, we had just a bit less than that! The kitchen bench and kitchen island are 60cm wide each, the gap between them is 90cm, and then the corridor area running down the side of the island is about 85cm – so in total we had 295cm (and actually there’s one point where the corridor is slightly more narrow as we had to put a pillar in for structural reasons). We haven’t complained at all about the width that we have and I find cooking in the kitchen very easy.