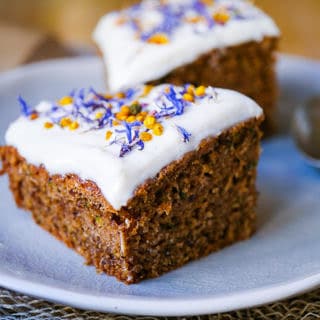
Gluten Free Oat, Hazelnut and Zucchini Cake
This gluten free zucchini cake recipe combines ground roasted hazelnuts, oats and buckwheat to make a healthier cake that's soft and delicious!
Print
Pin
Ingredients
- 140 grams hazelnuts (1 cup)
- 120 grams gluten free rolled oats (1 1/3 cups)
- 100 grams buckwheat flour (3/4 cup)
- 125 grams coconut sugar (1 cup, loosely packed)
- 25 grams tapioca flour (3 tbsp)
- 1 tsp bicarb soda
- 1 tsp baking powder
- 1/2 tsp salt
- 1 tsp ground cinnamon
- 5 eggs
- 1/4 cup extra virgin olive oil (60 mL)
- 2 tsp vanilla extract
- 200 grams zucchini (1 1/2 cups grated)
- 250 grams ricotta cheese
- 1/2 cup unsweetened Greek yoghurt
- 3-5 tbsp honey or maple syrup (or other liquid sweetener)
- 1 tsp vanilla extract
- 1/2 tsp ground cinnamon
Instructions
- Preheat oven to 180 C and line a 9-inch (23cm) square or round cake tin* with non-stick baking paper along the base and sides.
- Spread the hazelnuts out on a small oven-safe tray or dish. Roast for 7-10 minutes until slightly darkened (they’ll smell lovely and toasted) then remove and allow to cool to room temperature.
- While the hazelnuts are cooling, continue with the prep. Place the oats in a food processor or strong blender and pulse until ground into a coarse flour. Then, add to a large bowl along with the buckwheat flour, tapioca flour, coconut sugar, baking powder, bicarb soda, salt and cinnamon. Set aside.
- In a separate bowl, whisk together the five eggs, then whisk in the olive oil and vanilla extract. Grate the zucchini and stir into the egg mixture. Set aside.
- Once the hazelnuts have cooled, place these into the food processor or blender and pulse until they form a coarse crumbly flour. (It’s okay if some small chunks of hazelnut remain; you don’t want to pulse for too long, otherwise the nuts will release their oil and break down to a nut butter!)
- Add the hazelnuts to the rest of the dry ingredients you put together earlier, and stir everything until combined. Then, pour in the egg-oil-zucchini mixture into the dry ingredients and stir again until you have a consistent batter.
- Scoop the batter into the lined cake tin and smooth down evenly into the tin. Bake for approximately 45-50 minutes, or until the top of the cake is a deep golden brown and feels firm to touch in the centre. The top might develop a few cracks too as it’s cooking, this is normal. (You can also test by inserting a skewer into the middle of the cake, it should come out clean or just with a few dry crumbs).
- Once the cake is done let it cool in the tin for ten minutes then place on a wire rack to cool to room temperature.
- While the cake is cooling, continue make the icing. Combine the ricotta, yoghurt, honey, cinnamon and vanilla until smooth. Start with 3 tbsp of honey, taste test and add more if needed. Once the cake is cooled, spread icing evenly across the top of the cake.
- Store the cake in the refrigerator; it should keep about 5 days. You can also freeze an un-iced version of the cake, it should keep well for 2-3 months if wrapped up well.
Notes
*You can use a different size cake tin for this recipe if you prefer; I have made it in both a 9-inch square tin and a 9-inch diameter round tin (obviously the square version comes out a little flatter). If you change the cake tin size, you may need to adjust the baking time a little to accommodate e.g. for a higher cake in a smaller tin, you may need to bake for longer. I think this cake would also be really lovely as muffins/cupcakes!
How to strain the yoghurt and ricotta for thicker icing:
- combine yoghurt and ricotta in a bowl;
- set up a sieve/strainer (plastic or metal is fine) so that it sits over another large bowl, ensuring there’s a gap between the bowl and the strainer, at least 1 inch;
- line the strainer with a piece of muslin cloth/cheese cloth so that the cloth hangs comfortably over the edges of the strainer;
- scoop the yoghurt-ricotta mixture into the strainer;
- place the strainer, hanging over the bowl, in the fridge and leave for 3-4 hours minimum, or overnight;
- once the time has passed, gently lift the cloth out of the strainer and you’ll have a thick ball of yoghurt-ricotta to use as your icing;
- mix in the rest of the icing ingredients and use as frosting on the cake. There will be clear liquid (whey) strained into the bowl, this is a probiotic liquid and you can use it to soak some overnight oats for your next breakfast!
- thick coconut yoghurt;
- cashew cream (soak 1.5 cups cashews in water for 4-5 hours, strain, then use a blender or food processor to blend until smooth. Add a little coconut milk until you get the desired consistency. Sweeten with honey, maple syrup or another liquid sweetener of choice);
- a vegan “cream cheese” substitute (typically made with tofu. Try to choose an organic one with not too many additives).
Have you made this recipe?I love seeing your creations! Take a photo and then tag me @nourish.everyday on Instagram!